 |
|||||||
|
|


|
|
|
#1
 09-29-2004
|
||||
|
||||
|
After many requests, Ive decided to put together my guide on how to acquire and put together your own high-res in-car single or double camera system. This system will sound hugely complicated to put together and operate, because it is. Thats why Mike Marinos service (Helix videos www.helixus.com) is so convenient. You give them $100, you get in the car, and when you get home therell be a DVD waiting for ya (if it takes you a few weeks to get home).
But if youre a control freak like me, and need to produce the best possible video, then its the only way to go. Youll also save money after two or three race weekends of use. This stuff works really well and the quality and reliability of it is really good. But again, if you don't want to be bothered with all of this 'stuff', then use Helix. 1. What youll need to buy Mini-DV Camcorder Bullet Camera System & Accessories Additional Low Gain Microphone Mounting Hardware for R/T 2000 Race Car Waterproof Camera Bag Cable Accessories Bungee Cords & Miscellaneous Other Accessories Detailed Buying Info Mini-DV Camcorder The smaller, the better. If you already own a relatively small camcorder, then what you have should be fine. If you dont own a camcorder, go get one. It doesn't really matter if you buy a cheap one or an expensive one - as long as you get a compact model AND it has an 'A/V In' jack, it will work. When you spend more, all you get for your money with these camcorders is better durability, more features and higher quality video when using the camera by itself (not as an in-car camera). They will all act like a VCR in the in-car system, with the same quality video, so dont kill yourself to buy the most expensive camera if all youll use it for is with your in-car system. The only recommended camcorder now is the Sony HC96. Its the only MiniDV camcorder with both analog video/audio inputs as well as a LANC controller input. You can buy it here: If you don't want the Sony for whatever reason, and want to see all the other choices (make sure you get a camcorder with the analog A/V inputs and a LANC controller port - otherwise it will not work well), click here. Also, make sure you buy one of those thick extended camcorder batteries as an extra. You dont want to run out of battery power at the track. Bullet Camera System Helmetcamera.com makes the Xtreme Kit 480 Line bullet camera system ($309), which I recommend. The biggest advantage over its competitors, other than its great image quality, is that helmetcamera.com sells replacement glass lens covers ($8) for its cameras. You'll need them. After every weekend at Lime Rock the lens cover gets so specked up you'll need to replace it. Especially if you're slow and you sit at the back of the field. The kit comes with: Color helmet camera, submersible to 100 ft. W / Sony super had ccd image pickup device. 4 ft. Waterproof audio/video cable Helmet Mount ('Xtreme Mount') Connectors for digital & non-digital camcorders High gain microphone w/clip Battery pack So, buy the Xtreme Kit 480 Line system ($309) and at least one 'replacement lens cover' for each race weekend you plan to do over the next two years. DON'T buy an 'Interchangeable Lens'. The lens that comes with the camera is the right one for our application. It's just 'wide angle' enough. Any more wide angle and the guy's rear that you tucked your nose cone into going up to the bus stop at WG will look like it's 100 feet away. I recommend that you also buy their remote control button ($59), so you can turn on the camcorder, start and stop the recording (and so you can also tell if the bloody thing is on...) after you've already tucked the bag away. Otherwise you'll have to wait until no more than a few minutes before your session to turn on the camcorder, hit record and then pack away the bag. Additional Low Gain Microphone The problem with the microphones that come with these systems is that they are high gain. VERY high gain. With the car engine off and sitting in the pits, it will beautifully record your 'conversation' with the guy you took off on the lap before (Hi Martin!). But at speed, there's no way that you can isolate the microphone well enough from vibration and/or wind, which it is waaay too sensitive to - you'll just hear tons of noise. But well still be using it. A quick and cheap solution is to ADD (no, not A.D.D.) of 'Radio Shack's Hands-Free Tie-Clip Omnidirectional Electret Microphone ($24.99 - Catalog #: 33-3013)  which is a powered microphone that does a decent job of recording racing audio. Youll be buying a few other pieces from Radio Shack, which youll find below, so dont order just yet. Mounting Equipment for R/T 2000 Cars You'll need to buy one of each of the three following parts from Ram Mounts Item # RAM-B-231Z - $13.95 - U-bolt (Holds the Bullet Camera)  Item #RAM-B-108B - $18.69 - Metal Strap and Ball Mount (Becomes the base for the Mount, and straps around the R/T 2000s roll hoop)  Item#RAM-B-201 - $13.62 - Double socket arm (Connects the two above)  The double socket arm is compatible with Helixs mount, in case they have left one on the car for you to use. If Helix isnt available at your race weekend, and especially if you want to do a double cam setup, youll need the Metal Strap and Ball Mount. Waterproof Camera Bag To hold your camcorder and everything else except for the bullet cam, you will need a good waterproof bag. Get the Lowe Pro SlipLock 50, $18.95 from B&H. 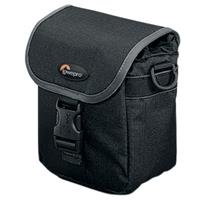 Cable Accessories Youll need a few more pieces from Radio Shack to make this contraption work. 1/8" MJK-Phono Plug #2740871 This will let you plug your Radio Shack Mic into the system ($4.00)  GoldPlated PlugtoPlug Coupler #274898 ($6.00) youll need this to have a double mic or a mic & scanner system  Bungee Cords & Miscellaneous Other Accessories You will need to get an assortment of bungee cords, preferably from 6 to 14 in their un-stretched state. Get them from your local hardware or auto parts store. These will hold your camera bag in whatever place works for you. More on that later. A bag full of black zip ties, around 4 or 5 inches long each, to help tidy up your cables. Also, you should try and get a 4 x 1 x 1mm thick strip of rubber to use an anti-vibration buffer between the bullet camera and the U-Bolt mount. Its not necessary, but a nice touch that cant hurt. Finally go get yourself two or three packs of 8-AA batteries for the bullet camera system. 2. Assembly Just follow the directions. Sorry, but Mike Marino, Allie and Lauren will not be there to do it for ya, so pay attention. Steps to take well before are going to race (the night before etc): 1. Connect the yellow bullet camera video-out plug into the yellow plug receptacle on the Coupler 2. Connect the High-Gain Microphone Power lead into the High Gain Microphone 3. Connect the Audio-Plug of the High Gain Microphone into the bullet-cam audio plug, and the other end into of the harness audio plug either of the white or red receptacles on the Plug-to-Plug Coupler. 4. Using the Radio Shack Phone Plug, connect the Low Gain Microphone to the remaining audio receptacle on the Plug-to-Plug Coupler 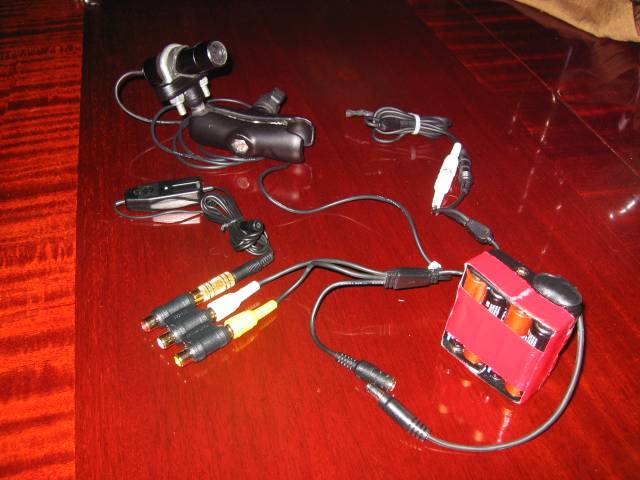 5. As an option, you can connect the earphone output from your scanner to the Plug-to-Plug Coupler in lieu of the High Gain Microphone. That is a REALLY cool effect. To find out what kind of cable you need, take your coupler and your scanner to Radio Shack and theyll oufit you. 6. Connect your Camcorders A/V cable to your Camcorders A/V in port.  7. Connect the ends of the A/V cord to the other side of the Radio Shack Plug-to-Plug Coupler  8. Load up your bullet-cam systems battery pack and either tape it up so the batteries dont pop out, or zip tie it tight. 9. Zip tie everything into a neat, tight bundles. DONT bundle or zip tie the bullet-cams video cable. Everything except for the bullet-cam will go in the bag, including the mics. 10. Put the battery pack inside the bag, oriented vertically and with the cable dangling up and free. Then stow as neatly as possible the Plug-to-Plug Coupler assembly and the microphones and cables in the bottom of your bag, alongside the battery pack. Make sure you leave the power receptacle for the bullet camera and the power lead from the battery up high and accessible, so you can connect the two together easier later on. 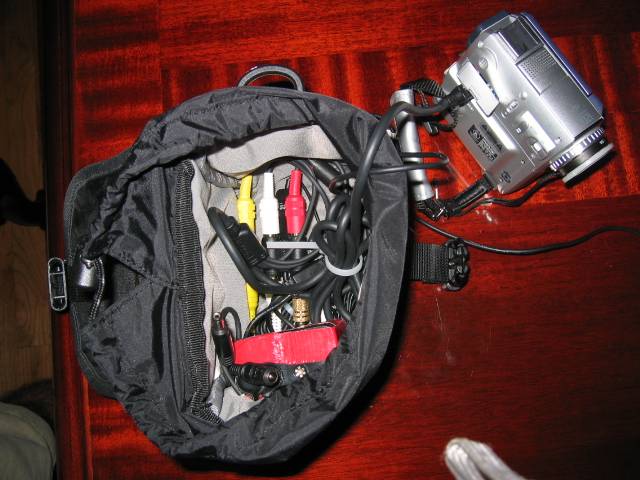 11. Bolt your bullet camera inside of the U Bolt assembly, preferably using the anti-vibration buffer. DONT over tighten. Just enough to prevent the camera from twisting or sliding under a few pounds of pressure will do. Make sure you mount the camera UPRIGHT. Dont be a yutz. 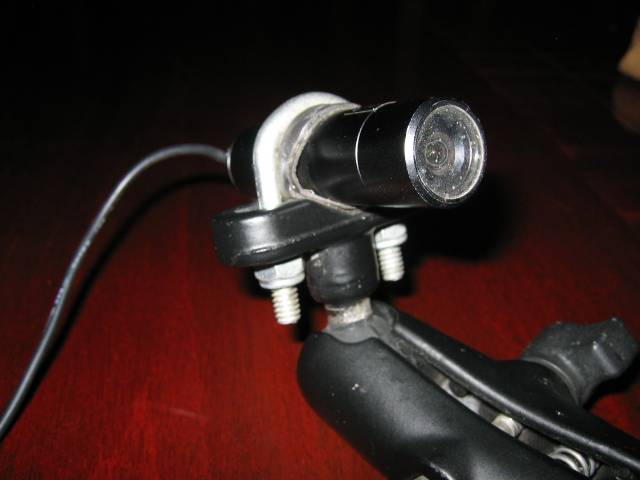 12. Test your system to make sure it works. Instructions are further below. Steps to take as soon as you have access to the car before your session: If someone is driving your car in the session immediately before yours, you may only have a few minutes to get the gear going, so hurry up. 1. Mount the bullet-cam assembly to the existing Strap Mount if its already there. If not, youve got to put your Strap Mount on too, which you should try to do this earlier in the day, as it takes the most amount of time and doesnt affect any other drivers. 2. Turn on your camcorder and put it in VCR mode. Connect the bullet-cams battery pack lead to the power receptacle. You should see on your camcorders screen what the bullet cam sees. 3. Adjust the camera mount so that the horizon is level and the car is in the middle of the frame. You will have to experiment with the vertical height, but most people like to have the bottom or the middle of their steering wheel at the bottom of the frame. That would put your helmet and hands in the frame, and also gives you plenty of above-horizon view. 4. If you have more than ten minutes before you have to get in the car, then shut your camcorder off and unplug the battery pack. Steps to take just before you get in the car 1. If you turned off the camcorder and unplugged the battery pack, then turn them both on. 2. Turn the Radio Shack lapel mic power switch on. 3. Start the camcorders record function, while its in VCR mode. 4. Carefully take the camcorder and pack it in to the bag, making sure you dont crimp the a/v cable and that you dont flick off the power switch. Close the bag carefully and tightly using the cinch-lock, especially when its raining. 5. Using one or two of the bungee cords you purchased, mount the bag on the rear bodywork under the roll hoop and on top of the fuel cap, or mount it inside the car. There are several places to mount it inside the car, and you will find the right place for it with some experimentation. Ill try to take some pics of mounting locations next week at Lime Rock and update this manual. 6. Go out and race, and try to screw up as badly as possibly. That will give you the best footage. Crashes, spins, spins that develop into crashes these are what make a video great. Stupid driving = watchable video. 7. When you are done with your session, and if your camera equipment hasnt been destroyed by your off(s), then remove your equipment and dont forget to press stop on your camcorder, unplug the battery pack for the bullet-cam, and finally flick off the Radio Shack mic power switch. 3. Now what? Now that youve produced a high quality video with questionable driving on it, you have to decide how to use it. You can either plug your camcorder into your tv (using the A/V cable) and watch it, or you can edit your video on the computer and maybe burn it to a DVD. If you want to just watch it using your camcorder, you will find that you may want to only plug in one audio channel from your A/V cable at a time. One channel will have the High Gain content on it, which is again great for the Go F Yourself conversations in pit lane. The other channel will have listenable racing audio on it. On the computer, you can just edit in our out whatevers appropriate. If you want to edit your videos, youll need to have a Firewire capable computer with editing software. Macs are brilliant with this stuff and are by far the easiest to use. They come with everything built in and make it somewhat easy (but VERY time consuming). A MUCH better option is to send your video off to Doug Harrison, wholl make a kick ass DVD for you with music and everything. His edits may even make you look like you drive better than your wife. 4. Double Camera Systems To setup a double cam (front and rear), you have two choices: 1. Build one system for yourself (which youll always use as your primary/front cam) and whenever you want to use a double system, get Helix to do the rear cam. It will save you half the work, and thats what I do. Or, 2. If you want to always do double videos and own your own systems, then duplicate everything here. Then just mount the two Strap Mount alongside each other on the roll hoop, and point one camera to the front, and one to the back. I dont have a picture of this setup, but Ill try to do one next week and put it in. Youll also have to use two different gear bags, because a bag that holds two camcorders and all of the requisite cables will be too big to mount anywhere. 5. Tips and Final Notes 1. You should focus the bullet-cam lens before you first use it. Unscrew the lens cap, remove the glass cover, and using a tweezer twist the threaded lens assembly in small increments both clockwise and counter-clock wise (its a threaded focus lens) until the focus is perfect. Make sure you do this with the camcorder connected to a TV, as the resolution of the camcorders viewfinder is crap and wont let you see if youve really locked the focus in. Also, point the camcorder to something at least 10 feet away when you are doing this. 2. The focus lens (NOT the glass lens cover) will un-focus itself in time from vibration. I suggest that once you are comfortable with your system and have used it a few times, that you should unscrew the lens completely and put a little bit of clear nail polish on the threads. Then focus the camera. If you dont do this, after 7 or 8 uses youll find that one of your videos was totally out of focus. Note: DO NOT USE commercial thread locks! 3. You can avoid all of the headaches of acquiring and setting up the system by paying me to do it for you. Even though the total of the parts (not including the camcorder) is around $500, and setup time is less than an hour, Ill only charge you $5,000 for the system. That doesnt include the camcorder. If you want me to get you a good camcorder, I can do that, too. I only charge a small 500% markup on the camcorder. Oh, by the way, shipping is always extra.
__________________
Team Juicy Racing's Racing School and Race Series Forums Last edited by cdh; 03-24-2008 at 10:26 AM. 
|

|
#2
10-01-2004
|
||||
|
||||
|
Re: Guide to putting together an In-Car Camera System
this one goes in the PHOF (Post Hall of Fame), thanks Sy.........
|
|
#4
10-07-2004
|
||||
|
||||
|
Re: Guide to putting together an In-Car Camera System
I can't believe that I haven't gotten one order yet. You would have thought it would be a bargain at $5K (plus shipping).
__________________
Team Juicy Racing's Racing School and Race Series Forums
|
|
#5
03-08-2005
|
||||
|
||||
|
Re: Guide to putting together an In-Car Camera System
UPDATE: I've been notified that the HC-20 camcorder by Sony is incompatible with our systems, as it does not have an A/V input. The HC-20 is the cheapest of Sony's camcorder line.
__________________
Team Juicy Racing's Racing School and Race Series Forums
|
|
#6
07-12-2005
|
|||
|
|||
|
Re: Guide to putting together an In-Car Camera System
 Anyone seen this?? I bought one today to play with it.... It has its problems, but there is potential. Can someone post a small segment of high-res video from their setup? I want to compare and see it the extrenal camera is actually comparable or not. http://product.samsung.com/cgi-bin/n...elTab=Features
__________________
Driving fast on the track does not scare me. What scares me is when I drive on the highway I get passed by some idiot who thinks he is Fangio.-Juan Manuel Fangio
|
 |
| Tags |
| data acquisition , in-car camera , in-car video |
| Bookmark This Thread |


«
Previous Thread
|
Next Thread
»

 Hybrid Mode
|
|

 Similar Threads
|
||||
| Thread | Thread Starter | Forum | Replies | Last Post |
| Skippy Prototype Car ('05-'07): Skippy Components Survey #6 of 8 - IN-CAR VIDEO | Gerardo | Race Series Discussions | 19 | 11-07-2006 10:31 PM |
| Guide to putting together an In-Car Video Camera System | sydude | Everything Else. Cars, Fun, Politics & More | 1 | 02-13-2006 10:45 AM |
| Mt Tremblant 2004 Video - Double Camera | sydude | Everything Else. Cars, Fun, Politics & More | 4 | 09-28-2004 01:40 AM |
All times are GMT -4. The time now is 02:31 PM.